Spell Better for iPad - Literacy Support for Dyslexia
► Getting started with Spell Better
Spell Better is intuitive and easy-to-use.
- Launch Spell Better and start typing. Tap on a suggested completion or predicted word to accept it and send it to the editor.
- Tap-and-hold (long-press) on a suggested word to see it's definition.
- Tap the magnifying glass (spell check icon) to run the powerful spell-checker.
- Accept corrections by tapping on the suggested words; the spell checker will continue.
- Tap-and-hold (long-press) on the Spell Check icon and tap on the "Learn" or "Ignore" buttons if you would like Spell Better to move on by learning a new word or ignoring it for this spell check session (e.g. if it has highlighted a proper noun).
- The spell checker is done when it stops highlighting new words.
- Access all settings by tapping the little "i" button. You can select a vocabulary size, change the text size, pick a specialized font, and much more.
- Tap on the "?" button at the top of Spell Better to see a help screen within the app itself.
► Text-to-Speech
Spell Better offers high-quality text-to-speech. It has three modes:
1. Tap once on the speaker button to hear your entire document read out. If you have already selected a section of text (say a paragraph), a single tap will read aloud only the selected text.
2. Tap-and-hold (long-press) on the speaker button to read out only the last sentence (relative to the cursor) instead of the entire document.
3. Double-tap on the speaker button to read out the five words currently listed in the prediction bank. (Note: You can also tap-and-hold on a word in the prediction bank to hear the pronunciation and see the definition).
Spell Better will highlight the word that is being read aloud as it goes through the document.
From the Settings menu in Spell Better (the little 'i' button), you can enable Speak Each Letter, Speak Each Word, and Speak Each Sentence. These provide audio support as you are writing.
You can select from four different voices: US Female, UK Male, AU Female, or US Male (Alex). The US Male (Alex) voice requires iOS 9. It also requires a free download from Apple before it starts working. Launch the Settings app on your iPad and navigate to General > Accessibility > Speech > Voices > English. There, find the voice named "Alex" and tap on it to begin the download.
For the best quality voices, turn on "Enhanced Voices" in the Settings App. Launch the Settings App and navigate to General > Accessibility > Speech Selection (turn it ON) > Voices > English. Then make sure "Enhanced Quality" is turned ON for the voice corresponding to your choice in Spell Better. The enhanced quality voice is downloaded free from Apple (this will take a few minutes). Once you do this, the Text-to-Speech will sound very realistic.
► Speech Recognition and Siri
Speech recognition is offered through Apple's Siri engine (dictation). This allows you to speak a word or sentence to send it to the editor.
This feature requires Siri. Since Siri is available only on the iPad 3 and newer, this feature will not work on the iPad 2.
Follow these steps to enable Speech Recognition in Spell Better:
- Select the QWERTY Default Keyboard - this is the default keyboard in Spell Better.
- Make sure Siri is turned ON (Settings App > General > Siri > ON).
- If you're on iOS 8, enable Dictation (Settings App > General > Keyboards > Enable Dictation > ON).
Step 3 is not necessary on iOS 7, but the first two steps are still required.
Once the QWERTY Default keyboard is being used, Siri is turned on, and Dictation is enabled (iOS 8), you'll be able to see a little microphone button to the left of the spacebar in Spell Better. Tap on it to use the speech recognition.

► Using the Dictionary
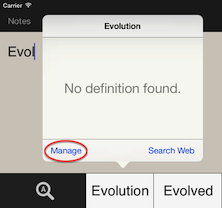
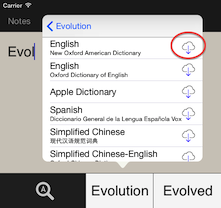
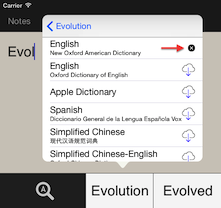
The dictionary is brought up by a Tap-and-hold (long-press) on the predicted word. If you haven't already downloaded a dictionary, you may see the "No definition found" message. Below you'll find detailed steps to download and use a dictionary in Spell Better. The download is completely free and comes directly from Apple. It takes only a few minutes to setup.
At the end of these steps you will have downloaded, installed, and used an English dictionary in Spell Better.
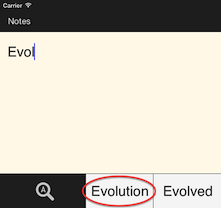
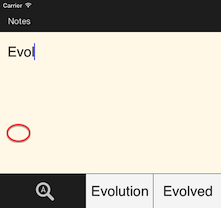
1. First, tap-and-hold on a predicted word. You'll hear the word pronounced and you'll see a pop-up come into view:
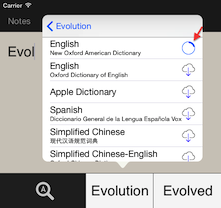
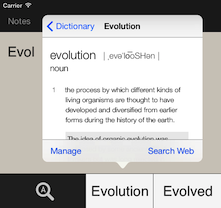
You have downloaded the dictionary and you can look up the definition of words in Spell Better.
► Inserting Pictures and Formatting
Spell Better is the only assistive writing app of its kind to support inserting photos and rich text formatting.
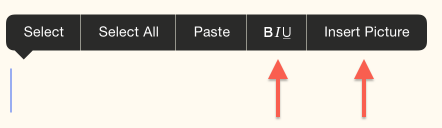
Tap or tap-and-hold to bring up the contextual menu and tap on the "Insert Picture" button. Spell Better will ask permission to access your photo library (just the first time). You'll then be able to select a photo and insert it into the editor.
Once you insert photos or use formatting in your document, you can export the document as a PDF.
► Privacy
Spell Better for iPad itself does not track usage and does not log or send any data to an external server for any reason. There is no advertising within the app. It does not contain any 3rd-party software or services and all core features work offline even without an internet connection. You can learn more by reading the privacy policy.
Apple, the Apple logo, and iPad are trademarks of Apple Inc., registered in the U.S. and other countries. App Store is a service mark of Apple Inc.